Archive for the ‘tech’ Category

Sync saved games with DropBox

Posted: July 27, 2011 by jellymann in computers, gaming, tech, windows

If you use Steam you probably know that some games sync your saved games to the Steam cloud (e.g. Half-Life), so owning multiple gaming-capable computers doesn’t become a chore. However, not all games currently support the Steam cloud (e.g. Terraria). For those games you can use DropBox to sync your saved games across multiple computers and, due to its cross-platform nature, multiple operating systems (e.g. if your game runs on a Mac, too).

For this how-to I am going to use Terraria on Windows as an example, but it can be easily translated to other games and operating systems as well.

Firstly, locate the necessary folders. Your DropBox folder is wherever you put it, probably in Documents. Your game’s save folder is wherever they put it. Terraria’s saved games are in My Documents\My Games\Terraria, or more specifically:
Windows Vista/7: C:\Users\Username\Documents\My Games\Terraria
Windows XP: C:\Documents and Settings\Username\My Documents\My Games\Terraria

Secondly, copy whatever saved files you want into a folder in your DropBox folder. For Terraria I just copied my Players folder, config file and my primary world into a folder called …DropBox\savegames\Terraria. Some people working off very slow connections or strict data caps might want to leave the worlds, as they can get relatively big. After copying the files and/or folders, make note of where their originals are and what they’re called (exactly), for example World 1 is called world1.wld and is in …\Terraria\Worlds. Next, delete the original files that have been copied to your DropBox.

Thirdly, create symbolic links (symlinks). A symlink is like a shortcut to a file or folder but looks like an actual file or folder to the operating system instead of a shortcut file. Thus if we create symlinks in the Terraria save folder that point to the copies in DropBox, Terraria won’t notice the difference. To create a symlink to a file, use the command mklink in a command prompt. To create a symlink to a folder, use mklink with the /D flag set. For example, if I copied config.dat from Terraria to DropBox, I’d create the symlink with the following command:
mklink "C:\Users\Username\Documents\My Games\Terraria\config.dat" "C:\Users\Username\Documents\DropBox\savegames\Terraria\config.dat"
And I’d create the symlink to the Players folder with the following:
mklink /D "C:\Users\Username\Documents\My Games\Terraria\Players" "C:\Users\Username\Documents\DropBox\savegames\Terraria\Players"
Just replace Username with your Windows user name, and change the drive letter and/or DropBox location where necessary. Once the symlinks are created you can begin playing and your savegames should be synced to their new folders.
Note: If you’re not concerned with data usage, you can move the entire Terraria folder into DropBox and just do one directory symlink, e.g.:
mklink /D "C:\Users\Username\Documents\My Games\Terraria" "C:\Users\Username\Documents\DropBox\savegames\Terraria"

If you get stuck with making symlinks, the command mklink /? might help.

Useful tip

Create environment variables for your DropBox and the game’s save location:
set DROPBOX="C:\Users\Username\Documents\DropBox"
set TERRARIA="C:\Users\Username\Documents\My Games\Terraria"

You can then use these variables in your mklink commands like this:
mklink /D "%DROPBOX%\savegames\Terraria\Players" "%TERRARIA%\Players"

Other OS

In Linux (and possibly the same in Mac OS) the ln command creates symlinks. However, there are a few differences from mklink:
link and target are swapped, the -s flag must always be set if you want to make a symbolic link, and there’s no need for the -d flag to be set for directories, as this only applies to hard links.
If you get stuck, read the man page! (man ln)

AutoHotkey puts the HOT in Hotkey

Posted: November 25, 2010 by jellymann in computers, hotkeys, keyboard, mouse, tech, windows

If you’re a Windows user and you don’t know about AutoHotkey, you’re living a sad, sad life.

AutoHotkey unleashes the full potential of your keyboard, joystick, and mouse. For example, in addition to the typical Control, Alt, and Shift modifiers, you can use the Windows key and the Capslock key as modifiers. In fact, you can make any key or mouse button act as a modifier.”

AutoHotkey (AHK) works with scripts. The basic syntax is fairly easy to understand, however some of the more complicated stuff is, well, more complicated.

Lets look at an example of a simple but very useful AHK script; a hotkey that runs a program, eg. Calculator, when WindowsKey and C is pressed:

#c:: Run, calc

The hash (#) represents the Windows Key. The letter after that is the key to be pressed with the Windows Key. Thus ‘#c‘ means the hotkey is activated when the WindowsKey and C is pressed. Other modifiers include Shift, represented by a plus sign (+), Control by a caret (^) and Alt by an exclamation mark (!).

Then there’s two colons (::) directly after defining the keys. Whatever is on the right of the colons is what is executed when the keys are pressed.

Run‘ quite simply runs the command after the comma, and ‘calc‘ is the command in Windows for opening the Calculator. You can do the same thing with ‘notepad‘, ‘cmd‘, ‘iexplore‘, and loads more.

Scripts can obviously be more than one line long, for example:

#c::
Sleep 10
Run, calc
return

Does basically the same thing, except for the ‘Sleep‘ command, which, in this case, waits ten milliseconds before running ‘calc‘.

The ‘return‘ function ends the multi-line hotkey. If you didn’t have this here and you define another hotkey after that one, it might think that hotkey is part of the previous one.

Besides built-in Windows programs like ‘calc‘ and ‘notepad‘, other programs can be ‘Run’. For example, I use Notepad++ and use Windows Key and N to launch it using the following script:

#n::
Sleep 10
Run, E:\programs\npp\notepad++.exe
return

You can even ‘Run‘ websites. For example, you could make Windows Key and F open Facebook in your default browser:

#f::
Sleep 10
Run, http://www.facebook.com
return

I have a very useful hotkey that Googles whatever I select by pressing Windows Key and G:

#g::
Send, ^c
Sleep 50
Run, http://www.google.com/search?q=%clipboard%
return

The ‘Send‘ command here “sends” Control+C to the computer as though you pressed it on the keyboard. This copies whatever text you might have selected into the clipboard.

After sleeping for fifty milliseconds (to make sure the computer is finished copying your selection) it runs Google with the copied text as the search criteria.

%clipboard%’ puts whatever is copied into the clipboard wherever you want. You can even put it in a ‘Send’ command (i.e. Send, %clipboard%)

Scripts can get very complicated, for instance, this script I have which allows me to move my Windows around without dragging from the titlebar by holding down the Windows Key (like Gnome/Ubuntu):

#LButton::
CoordMode, Mouse ; Switch to screen/absolute coordinates.
MouseGetPos, EWD_MouseStartX, EWD_MouseStartY, EWD_MouseWin
WinGetPos, EWD_OriginalPosX, EWD_OriginalPosY,,, ahk_id %EWD_MouseWin%
WinGet, EWD_WinState, MinMax, ahk_id %EWD_MouseWin%
if EWD_WinState = 0 ; Only if the window isn’t maximized
SetTimer, EWD_WatchMouse, 10 ; Track the mouse as the user drags it.
return

EWD_WatchMouse:
GetKeyState, EWD_LButtonState, LButton, P
if EWD_LButtonState = U ; Button has been released, so drag is complete.
{
SetTimer, EWD_WatchMouse, off
return
}
GetKeyState, EWD_EscapeState, Escape, P
if EWD_EscapeState = D ; Escape has been pressed, so drag is cancelled.
{
SetTimer, EWD_WatchMouse, off
WinMove, ahk_id %EWD_MouseWin%,, %EWD_OriginalPosX%, %EWD_OriginalPosY%
return
}
; Otherwise, reposition the window to match the change in mouse coordinates
; caused by the user having dragged the mouse:
CoordMode, Mouse
MouseGetPos, EWD_MouseX, EWD_MouseY
WinGetPos, EWD_WinX, EWD_WinY,,, ahk_id %EWD_MouseWin%
SetWinDelay, -1 ; Makes the below move faster/smoother.
WinMove, ahk_id %EWD_MouseWin%,, EWD_WinX + EWD_MouseX – EWD_MouseStartX, EWD_WinY + EWD_MouseY – EWD_MouseStartY
EWD_MouseStartX := EWD_MouseX ; Update for the next timer-call to this subroutine.
EWD_MouseStartY := EWD_MouseY
return

Don’t ask me to explain this, I got it from somewhere else. By the way, anything after a semi-colon (;) is a comment and is ignored by AHK.

Here are a few more that I use:

Windows Key and H toggles Show/Hide Hidden Files in Explorer:

#h::
RegRead, HiddenFiles_Status, HKEY_CURRENT_USER, Software\Microsoft\Windows\CurrentVersion\Explorer\Advanced, Hidden
If HiddenFiles_Status = 2
RegWrite, REG_DWORD, HKEY_CURRENT_USER, Software\Microsoft\Windows\CurrentVersion\Explorer\Advanced, Hidden, 1
Else
RegWrite, REG_DWORD, HKEY_CURRENT_USER, Software\Microsoft\Windows\CurrentVersion\Explorer\Advanced, Hidden, 2
WinGetClass, eh_Class,A
If (eh_Class = “#32770” OR A_OSVersion = “WIN_VISTA”)
send, {F5}
Else PostMessage, 0x111, 28931,,, A
Return

Windows Key and Right Mouse Button (Yes you can combine with mouse events!) minimizes the Window under the mouse cursor:

#RButton::
MouseGetPos, , , WinID, control
WinGetPos, WinX, WinY, WinWidth, , ahk_id %WinID%
WinMinimize, ahk_id %WinID%
return

Windows Key and Q is a lot more comfortable than Alt F4, which is a commonly used hotkey for me. This simple one-liner saves me some wrist aerobics:

#Q::WinClose,A

Check out the Tutorial on AHK scripting, the list of keys, or the list of commands that you can use.

I hope you find these scripts useful. Also, I’d love to see what scripts you guys are using, too.

Special thanks to @EttVenter for telling me about the awesomeness of AutoHotkey, and @brskln, who’s recent tweets inspired this blog post.

Read my other post for a few more scripts to make your life easier.

Look mom, no mouse!

Posted: October 13, 2010 by jellymann in computers, keyboard, mouse, tech

Using a computer with no mouse isn’t as hard as you think… if you think it’s hard. Pretty much every program has shortcut keys, as well as windows itself, and they pretty much do everything. Obviously you lose a few features like being able to draw stuff and play certain games.

Here’s the thing: Using the mouse requires you to move it, and the bigger your screen, the more you have to move it to get to places. Think of those massive 30″ Apple HD Cinema Displays, the distance between the menu bar and the dock is outrageous. The cursor has to pack a suitcase and padkos before it goes on it’s vacation to South Desktop.

The keyboard, however, has not changed its basic size since it’s conception due to the fact that the human hand has retained its overall dimensions. Moving your hand across the keyboard to reach a certain key can take split-seconds.

Some of the first keyboard shortcuts were introduced by Apple, of course because they are like the king of user interfaces. Here are some of the most used Command (or Apple) Key shortcuts:

+Q quits the current program (like totally quits it)
+W closes the current window (doesn’t quit the program, though)
+T opens a new tab in Safari, Firefox, Chrome.
+Space opens a quick search with spotlight.
Shift+Command searches through menu items.
+Z undoes what you just did (resembles the action of striking out a mistake)
(+X cuts the currently selected text/item (resembles a scissors) basically like copying and then deleting the original) This has been removed from Mac OS?
+C copies the currently selected text or item
+V pastes the currently copied or cut text or item (resembles an arrow pointing downward “into” the document/folder/whatever)

Although some of the letters have some sort of “meaning”, isn’t it oddly coincidental that all of these keys are in one continuous line right next to the Command button? meh… Maybe the guy who invented the QWERTY Keyboard knew about this.

Windows computers have their not-so-all-powerful Windows Key (or WINKEY, which is a pretty bad name depending on how you read it). Now that I think about it, the Windows Key is probably the least used function key on the keyboard, for the average computer use that is. Here are some of them.

Just pressing the Windows Key by itself it opens the start menu
+D shows the desktop, press it again to bring all your windows back.
+M minimizes all windows.
+Shift+M unminimizes all the windows you minimized with the previous shortcut.
+R opens the run dialog.
+E opens an explorer window at “My Computer”.
+F opens a search window.
+Tab cycles between taskbar items.
+Shift+Tab .smeti rabksat neewteb selcyc
+L locks the computer.
+U opens the utility manager, for stuff like the magnifier, Microsoft Sam’s annoying text-to-speech and the the on-screen keyboard.
+Pause opens System Properties.
Windows 7 added a bunch more:
+1…9 opens or activates the first nine programs on the “Superbar”.
+G cycles through desktop widgets.
+Arrow Keys manipulates the size and position of the active window. Play around with it, you’ll get the idea.
+Home minimizes all but the active window.
+Space makes all the windows transparent (like mousing over the “show desktop” button).
+Tab doesn’t do the same as XP, but rather activates that silly Aero Flip or whatever it’s called.
+T does what WIN+Tab does in XP.
+B switches focus to the system tray.
+Plus zooms in
+Minus zooms out

Not to mention all the useful shortcut keys that don’t use the Windows Key:

Alt+F4 is everyone’s favourite, isn’t it? Easy to use, it has one basic function: Quit! It also brings up the Shut-down dialog when no window is in focus (like when you’ve quit all your programs with it already! Muahahahaha!!)
Ctrl+Esc opens the start menu. I only ever used this on an old IBM laptop which didn’t have a Windows Key, which is very frustrating since I rely on so many Win+ shortcuts…
Alt+Tab switches between windows. In Windows 7 and some Linux distros, all other windows except the one selected will be visible during the switch.
Alt+Shift+Tab .swodniw neewteb sehctiws. You get the idea?
Alt+Enter does different things depending on the program. In explorer and Internet Explorer, it displays the properties of the selected file or webpage respectivly. In most games it toggles full-screen/windowed mode (e.g. Far Cry 2, DOSBox, etc.)
Ctrl+T opens a new tab in Internet Explorer, Firefox, Chrome, Safari, Opera, etc…
Alt+Space is like right-clicking on the title-bar.
F1 for help.
F2 renames selected file.
F3 for finding stuff, like words in documents and webages. Also “Find Next” while you are finding something.
F4 activates the menu bar of a window. Windows Explorer, Internet Explorer and a few other programs have the menu hidden, F4 shows hidden menu bars. The Alt by itself also shows hidden menu bars while activating them.
F5 reloads/refreshes the page.
F8 opens Windows boot options (like Safe Mode, etc) when pressed during Windows boot.
F11 makes Windows Explorer, Internet Explorer, Firefox, and other web browsers full screen, otherwise known as ‘Kiosk’ mode.

And don’t forget that little key which opens the right-click menu. I find it very useful sometimes.

There are still hundreds more useful (and useless) shortcuts out there. Most are for specific programs (like the “F” keys in Corel Draw)

However, you are by no means limited to these shortcuts alone. There is an amazing utility called Autohotkey which allows you to create your own shortcuts for literally anything on your computer. It goes beyond keyboard shortcuts, as it also has features for the mouse and joysticks.

Let me know if there are any common, useful shortcuts I missed out. I have a feeling I’ve missed at least one very important one. lol

I would post some of my Autohotkey scripts, but my computer with all of them is broken. I promise to post all of them when it’s up and running again.

Overclock a Dinosaur

Posted: October 2, 2010 by jellymann in computers, CPU, firsts, GPU, motherboards, overclocking, tech

Since I messed up my computer with the whole cpu cooler fiasco, I’ve had to go back to my old PC. The specs are as follows:

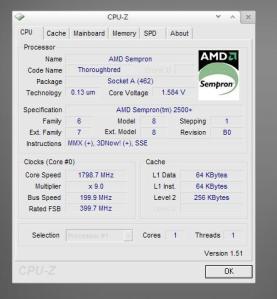
Processor: AMD Sempron 2500+ @1.5GHz (166MHz * 9.0)
Motherboard: ASRock K7VM3, Rated FSB: 333MHz
Memory: 2x 1GB DDR @200MHz
Graphics: Inno3D GeForce 6600 @300MHz, 256MB @500MHz
Hard Drives (2): Seagate Barracuda 7200rpm 200GB + 80GB (P-ATA IDE)
Optical Drive: LG Super Multi DVD re-writer
PSU:
ISO 300WSwitching Power Supply
Operating System: Windows XP Service Pack 3

For the technologically challenged: it’s crap. These days you can get a fridge with more processing power than this thing. (ok I’m over exaggerating, I’m actually writing this blog post on it within Firefox 3.6.8 while playing music through iTunes 10)

Being used to my “reasonable” Core 2 Duo and HD4870 I was extremely dissatisfied with the above setup. Tests showed a very sad eight frames per second (average) on lowest graphics settings in Crysis @800×600, and less than one frame per second when blowing up buildings with the rocket launcher, physics set at medium. Enabling shadows halved the average frame rate to around four frames per second. Dropping screen size below 800×600 did not make much of a difference, the issue of pixel count giving way to other factors such as shaders and polygon count that may not rely on screen resolution (as far as I know, just speculating here).

Since this old brontosaurus of a pc isn’t really of much value to me (besides sentimental value. I wouldn’t sell it to anyone, although I doubt I’ll get anything for it if I did) I thought I might take a stab at this whole overclocking thing. I’ve overclocked my HD4870 before, but this is the first time I’ll be overclocking a processor.

WARNING!
To all you folks out there who think overclocking is a fun experience (actually it isn’t very fun) and a quick way to get more power without buying new hardware, make sure know what you’re doing before you do it, or just don’t do it. Don’t say I didn’t warn you…

Since this old rig (oil rig?) is old, none of it’s components really output an impressive amount of heat, giving me good headroom for bumping the hertz up a little bit. Even with really lame stock coolers, the processor usually didn’t go higher than forty under load, and the GPU stuck around the sixties, also not changing much under load. I didn’t burn my fingers on the GPU like I always did with my 4870 every time I stuck my hand in the case.
(Temperatures are in degrees Celsius, for all you Americans reading this, convert!)

the Overclock:

The ASRock K7VM3 has a feature they call Hybrid Booster “safe” overclocking. This allows for easy changing of the bus speed within BIOS. Over-enthusiastically I took a huge leap from a bus speed of 166MHz to 233MHz. NOTE: This is a stupid thing to do! Always overclock in small increments, like 5MHz, and every time rebooting and checking up on how the computer does under the new speed. Thankfully ASRock’s “safe” overclocking did not allow my idiotic jump, and promptly reset the bus speed.

I still didn’t quite take the 5MHz advise very well (and by no means am I encouraging this behavior) and increased it in 10MHz steps. And I don’t know if the Crysis CPU Benchmark constitutes as a CPU stability test, but it definitely allowed me to see that the overclocking was working.

The K7VM3 uses jumpers to set the CPU multiplier. The manual shows, in a rather confusing way, where to put the jumpers to get the desired multiplier. By default (with no jumpers) the multiplier is at 9.0, and can be increased (or decreased) in steps of 0.5, up to a whopping 24. I set it to 10.0 and very excitedly switched it on and… It didn’t work…. it still showed 9.0 no matter what I did. Sadly, this specific processor is locked to 9.0 and cannot be changed without possible mutilation. I’m not going to try that!

I stopped at a bus speed of 200MHz, resulting in a substantial CPU clock speed increase of 300MHz to 1.8GHz. Very happy I tested it on Crysis and saw an increase of one frame per second in the CPU benchmark! w00t! 🙂


To overclock the GPU was much easier, but unfortunately not as fantastic. Using RivaTuner, I was able to push the core clock speed by 17MHz (yippee….) and the memory frequency by 14MHz (wow….). Not all that great of an overclock but an overclock nonetheless.


However, I am a little concerned about the current stability of the system. Since the overclock, Firefox has randomly quit (which it never does) twice and earlier the computer reset without warning, Windows later telling me that there was a serious error and had no explanation as to what happened. I’m glad nothing has happened while writing this blog…

I will do some tests with Prime95 soon and will post the results. I don’t know if I want to see the results…

Other tools used: CPU-Z and GPU-Z

WARNING!! Dangerous Temperatures.

Posted: September 28, 2010 by jellymann in computers, CPU, tech

I feel like such a nOOb. Ok, I am such a nOOb. Especially with hardware. Sure I know what the difference between a GPU and a CPU is and how to put RAM in my MOBO. meh…

When it comes to cooling, I’m a fail at it. My PC is HOT! And no it isn’t such a great PC, I mean my CPU usually runs at 45-50 C on a cool day. Now it’s summer it nearly gets to 60. Ouch! My ATi HD4870 runs between 70 and 80. So sad…

I’ve never changed my cooling system. Always stuck with stop, because so far that’s kept me going. Since my latest computer I’ve constantly been thinking about getting a Thermalright heatsink for my processor and graphics card. The problem is that I never really had too much money, and thought it wasn’t really worth it… until today.

Some month or two ago a friend of mine’s computer just stopped working, and today he gave me his processor to test (just in case maybe his motherboard was at fault, not his processor). It’s a Core 2 Quad Q6600, which for me was a nice “upgrade” I was hoping to have for maybe a few days. Sure the processor works fine, but having swapped it out a little too hastily, I made a fatal mistake. (well, almost fatal)

For those of you who don’t know, there is some substance between your processor and it’s cooler. That stuff is called thermal paste. What it’s made of, I have no clue, but it doesn’t matter because it’s absolutely necessary (Just don’t brush your teeth with it). If you put a heatsink or some other kind of cooler on your processor, graphics card, northgate, or any other chip that gets hot, there has to be some thermal paste in between the surfaces. Without it, the cooler is a big piece of metal with a fan on it, blowing air and dust all over the place (i.e. not useful).

Silly me: when I swapped the processors, I neglected the whole thermal paste thing and just popped off my cooler, stuck in the new CPU, and popped the cooler back on. Simple right? Wrong! After switching my PC on with the new Core 2 Quad installed, I watched as the temperature slowly increased… 53… 66… 75… 89… oh crap that ain’t right!

I’m glad I switched it off before it frizzed (My friend would have literally killed me if I returned him a dead processor).

So, if you’re getting a new cooler or a new processor, always remember your thermal paste! 🙂

P.S. If you’re getting a new cooler, always… I repeat always buy Thermalright. Nothing else. And while you’re about, grab yourself some Arctic Cooling thermal paste. You can buy the stuff from The Prophecy Shop. You can’t go wrong.

Dualscreen FAIL!

Posted: September 23, 2010 by jellymann in tech

I have finally given up on my dual-screen attempts until further notice.

The reason for this is not a software issue, but a hardware issue. No, my graphics card hasn’t blown up or anything like that. What I failed to mention in my previous post about dual screening, is that the LG I had on the left did not have DVI. Who in their right mind would leave out DVI on a fullHD monitor? What were you thinking, Goldstar? And yes, that’s what the monitor was identified as when I looked in the display settings…. Goldstar…

The biggest beef I had with LG’s VGA-only screen is that it causes confusion in dual screening because my Samsung (the screen on the right) is plugged in with DVI. In Windows 7, there is no problem here because Windows “magically” sorts out all the confusion. Ubuntu, on the other hand, with the proprietary ATi Drivers, could not seem to understand what the heck was going on! I screwed around with it for about half and hour until I gave up.

The confusion: ATi’s drivers was adamant that the LG was on the right… no matter how many times I told it that it was on the left. I even swapped the plugs at the back of my PC and they were still swapped around. Secondly, the LG would only accept sizes up to 1600×1200, which is not it’s native resolution. In fact, FullHD wasn’t on the list at all! If I changed any setting, wither it would screw up X and make it unusable, or it would tell me to reboot. After rebooting, however, the problems started from square one again, namely the monitors being swapped around all the time!

In the end I ripped out the LG in anger and threw it across the room, vowing never to buy LG ever again! Not actually, but I was very angry at both ATi, for their lack of consideration of Linux users, and LG, for their ignorant negligence. Do the world a favour LG, go back to making washing machines!

So, to summarize, if you’re looking to do any kind of dual-screening, make sure both your screens use DVI inputs*, otherwise you are going to find yourself in some serious trouble. Even better, both your screens could be the exact same model, could you imagine that!?

See my previous post about dual-screens.

*You could also have them both use VGA inputs, but who in their right mind… ?

Dual-screen Gaming Not Much Fun Without Three Screens

Posted: September 15, 2010 by jellymann in computers, gaming, tech

Ever played a game with more that one screen?

It’s a very expensive thing to do, mostly because you have to pay twice or three times as much on screens. I have two 23″ FullHD displays and I’m quite happy with, depite their individual problems (One has no DVI and the other suffers from extreme backlight bleeding and a dead pixel) as well as the problems involved in dual screening them (The one is an LG and the other is a Samsung, go figure).

The first time I ever played a game with two screens was Command & Conquer: Tiberian Sun. I had an old GeForce 6600, with nVidia’s horizontal and virtical spanning. This useful feature turns all your attached screens into one big one, allowing some programs to maximize across all of them. Tiberian Sun was one of those games with an ini file you could play around with. It was easy to change the width and height of the screen to anything you could imagine. e.g. 2560×1024. I only had CRT screens back then so my head hurt a lot having to look at two of them.

In my opinion, the kind of games that benefit most from multiple displays are strategy games. The extended view of the battlefield makes a huge difference. Older games such as Age of Empires and Command & Conquer had fixed 2D pictures so that the higher the resolution, the smaller the pictures on the screen, and the more of the battlefield you could see, so the poor guy with the crappy computer (yeah, one which could only run AoE at 640×480!?) or only one small screen, had a disadvantage. Most of the new 3D games don’t allow this sort of exploitation, as a change in res just means more pixels for the same-sized object.


Supreme Commander, my second dual-screen gaming experience. Now this game is serious about it’s dual-screening capabilities. It uses any other display connected to the computer to display an extra view of the battlefield. That plus the ability to partition screens allows incredible control over what’s going on. Also an extreme advantage over the guy with the 15″ CRT in the corner over there, who probably couldn’t afford a good enough graphics card to run the game smoothly at even 800×600. lol. A good thing about this game’s dual-screen capability is that it does not rely on ATi’s Hydravision or nVidia’s H-Span, so I don’t have to use funny tricks to get it to work. Bottom line here is that Gas Powered Games really hit the spot with this one! If you have two screens you should definitely try it!

Burnout Paradise interested me in it’s option in the configuration screen allowing up to three displays. In excitement I hooked up my other screen and selected “2” to see what it looked like. I was disappointed at what I saw. All it did was make one super-wise view and squish it into only one screen. It dawned on me that it required nVidia’s horizontal spanning , which my new HD4000 did not have (damn you ATi!). So I checked it out on my friend’s computer and it didn’t look all that great anyway, so no real loss.

Determined to get horizontal spanning on my computer I Googled all over the place and found some interesting piece of software called SoftTH (Software Triple Head) which sort-of does the same thing a Matrox TripleHead2Go does but for free (instead of R3000+). What is boils down to is that I can do what nVidia can do, but with my ATi. Sure it has a few problems, but it works great! The latest 2.0.1 Alpha version is the one you should use, all the 1.x ones are old. Get it here.

Below are some of my experiences (And yes the saturation is higher on the left monitor, I only discovered after I took these screenies that it had been changed in CCC \) :

Burnout Paradise. My first run with SoftTH gave me what I thought would happen, a car cut in half in the middle.


But after changing the configuration to use 2 displays I got it right. As you can see it’s no fun unless you have three.


Counterstrike was a funny one. Look where the crosshair is!


It obviously was not designed to be played this wide…


HAWX would have cut the plane in half but I had to see what it would look like…


…but all I got was… nothing… 😦


Ok so SoftTH is still in Alpha so you can’t expect everything to work as planned. But it’s some really awesome software and it allows for some pretty wicked screen setups:

Render resolution is 5888×2100!
I wish that was my desktop, except for that little screen at the top, it looks a bit weird.

P.S. I had a fail, eventually…

Inception, Part Two

Posted: September 11, 2010 by jellymann in computers, inception, linux, tech, ubuntu, virtualisation

Things haven’t gone quite as I had planned, so we’re not going to the next level “literally” yet like I promised, so for now I’ll give you a little insight of what I’ve been up to along the lines of the Inception project.

Today I’m exploring what Linux distros work well in Virtualbox. So far, as we’ve seen, Ubuntu 10.04 Lucid Lynx works great, Ubuntu 10.10 Maverick Meercat works, but with only partial interoperability with the host OS, due to it’s new X version 1.9. Virtualbox’s Guest Additions only supports version 1.8 so far.

I decided to try Fedora 14 Alpha, but to my dismay the live CD wouldn’t boot at all. I checked online for solutions but unfortunately there is no support for alpha and beta guest operating systems in VirtualBox, which is sad for Maverick also.

Fedora 13 installed and booted fine, which is a huge step further than what I got with Fedora 14. Unfortunately I couldn’t get the Guest Additions to install, no matter what I tried. I installed all the headers, necessary building dependencies and stuff, downloaded a kernel source RPM (which didn’t quite install properly) but alas nothing helped. All I had was the default crappy cursor integration that Lucid also had when I first booted it up.

N.B. The default crappy cursor integration feels funny and does not hide the cursor when you leave the machine’s window, whereas VirtualBox’s Guest Additions’ cursor integration hides the cursor, and feels exactly the same as the host’s cursor.

I haven’t used OpenSUSE for years, so I wasn’t surprised that I was surprised by the GUI changes made since then. But what made me most excited was that OpenSUSE comes with full VirtualBox Guest Additions out of the box! Woot! Now I don’t have to worry about THAT anymore! I ran the live CD and the first thing I noticed was the smoother mouse integration, then the windows had shadows, went transparent, wobbled, and then I dragged off the edge of the screen and the desktop cube went crazy. I guess the Compiz guys didn’t take VirtualBox into consideration…

And now for our special guest for today, lets have a round of applause for Microsoft Virtual PC 2007! Yes I know it sucks compared to VirtualBox, and it eats my computer’s resources, but it still kinda works. I only ever use it for running Windows 98 for occasional compatibility reasons, which are few, and because VirtualBox doesn’t support Windows 98 (Did Sun perhaps think it was too old?). I decided to pull this old relic out of the closet and install Fedora 13 on it (Previously I did try 14 but it failed even more than on VirtualBox). To my surprise everything went fine, it works quite smoothly, and it connects to the internet. Now I just have to install the VM Additions (if they even work) which I will do another time.

Lucid and OpenSUSE Updating next to each other. Don’t they look cute together!


All three running quite happily together. Purple, Blue, and Green:


So here’s the summary:
Ubuntu 10.04 Lucid Lynx: Works Great
Ubuntu 10.10 Maverick Meercat: Works, but with limited Guest Additions support (No 3D Acceleration or Automatic Screen Resizing)
Fedora 13: Works, but couldn’t get Guest Additions to work
Fedora 14 Alpha: Couldn’t even install it
OpenSUSE 11.3: Works fantastically, Guest Additions worked immediately out of the box
Fedora 13 on Microsoft Virtual PC 2007: lol

Thanks for reading.
Have a look at Part One of my Inception Project.

Inception, Part One

Posted: September 8, 2010 by jellymann in computers, inception, linux, tech, ubuntu, virtualisation

This idea I am about to share with you now is inspired by the movie Inception. I love that movie! It’s really thought out well, and the concept is so cool and mind-boggling.

Similar to the dream concept in Inception, there is something called “lucid dreaming”. A lucid dream, in simplest terms, is a dream in which one is aware that one is dreaming. My friend found that on wikipedia. Now here’s the cool part: Ubuntu’s latest stable version is called Lucid Lynx. How cool is that!? So that’s the OS I decided to use for this project. Another cool thing that makes Lucid lucid, is that it knows it’s running in a Virtual Machine. This is evident in the fact that it provides mouse cursor integration out-of-the-box. Cool, right?

So I begin. The Lucid installation went on smoothly, it installs just like it would in reality. This means it takes just as long, if not longer… It sits at 79% for like half an hour on my machine, and then crawls along from about 86%, mainly because it needs to download packages off the internet, and I have a crap slow internet!

It took a while (maybe an hour or so) but now I’ve arrived to my new Lucid desktop, running normally. I’m glad I haven’t come across any hiccups so far, but to my dismay it did not come with all the guest additions installed like I thought, only mouse cursor support is default. Oh well, that’s not a huge problem, I’ll just install the guest additions myself.

I’m installing them using apt-get instead of the ISO provided with Virtualbox. I’m hoping this is a better way. It sure is easier to install and uninstall, but it means I still have to download the whole thing which is a pain on my internet connection. I had to wait at least half an hour for 8 minutes O_o (Maybe there’s some kind of time difference between the Host and the Guest OS here… 15 minutes = 1 hour?).

So it finally finished downloading and it gives me this fail message. After Restarting I got no additions. So all that downloading and waiting hours (or minutes?) was fruitless. Oh well it’s not a train-smash, I’ll just revert to using good old VBoxGuestAdditions.iso and see if I get any luck with that.

Well would you look at that? It worked! Now I’ve got all the juicy features of the guest additions. I guess there’s nothing wrong with the ISO after all. I’ve got it working in seamless mode and all the other juicy features. Yay!

So that’s it for now. This is part one of my Inception project. Stay tuned for the next installment where we will take it to the next level (literally)
Head on to Part Two of the Inception Project.

Jailbreak! :)

Posted: September 7, 2010 by jellymann in firsts, hacking, iphone, jailbreak, tech

I jailbroke an iPhone the other day.

A friend of mine just got his iPhone 3G fixed, and he wanted to me to jailbreak it for him. I’ve never done it before but I was confident I could do it. After many hours of reading discouraging reviews about people’s iPhones going blank and never switching on, I decided to do it anyway.

Redsn0w seemed a good choice, it seemed relatively simple: plug in your iPhone, click a few buttons, wait a while, and viola! I downloaded redsn0w 0.9.2 because I think that was the most stable version. I wanted to use 0.9.5 and install iOS 4.1 beta but I thought I’d rather stick with something simpler. Besides, I couldn’t find a place to download the exact iOS I needed. So I decided to go with downloading plain ol’ 3.1.2 ipsw.

I thought I had to use iTunes 9 to do all of this but it turns out iTunes 10 still does the trick, despite it’s disgusting new icon (bleh!). I was afraid that Apple disabled shift-clicking on the update button but I was relieved to see I could still load a downloaded ipsw.

Redsn0w is quite simple really. Load the ipsw, then it processes it. Plug in the iPhone, switch it off, click a button, hold down some buttons to get into some DFU mode or something, let it do it’s thing, then after a painstaking length of time the jailbroken iPhone will now be ready to play around with 🙂

On the topic of Cydia, the little app that comes with jailbreaking an iPhone, we didn’t seem to get it going correctly. Damn thing couldn’t download half the stuff. I guess the repositories are down? Deprecated? On strike? Eaten? I don’t know. Too lazy to find out at the moment but maybe some day I’ll check it out.

Note to all people new to jailbreaking: be patient, and try not to throw your iPhone at your computer screen.

I should be studying now, but thanks for reading. Happy jailbreaking! 🙂